Rolling Method

The strength in which the roller pulls up your skin can be adjusted by changing the angle at which you hold the handle

<When Pushing the Rollers Forward>
Gradually raise the end of the handle to increase the pull of the rollers
*Lower the handle if you begin to feel pain
<When Drawing the Rollers Back>
Gradually lower the end of the handle to increase the pull of the rollers
*Raise the handle if you begin to feel pain

Tips on Rolling 

Roll in the direction indicated by the arrows and increase or decrease pressure in accordance with the thickness of the lines

The photos below are overlaid with the following arrows to show how and .which direction to roll over specific parts of your body for optimum results

1. Roll in both directions
2. Use more forces as you roll from the narrow to the wider end.


Decolletage & Neck

Roll up and down between your collarbone and your chest.
Hold your ReFa upside down and roll in big movements up and down from below your ear to your shoulder.


Face

1. Consciously and steadily roll along the line of your lower jaw

2. Roll along your cheekbones from the corners of your mouth to in front of your ears

3. Roll up and down between the corner of your mouth and the side of your nose. While doing this, lift your cheek upward with one roller.

4. Position one roller above the outer corner of your eye and roll it along the side of head.

5. With your eyes closed, slowly roll from your forehead up to the top of your head.

*Make sure your hair does not get caught in the device.

6. Roll up and down with one roller positioned above your ear.

*Make sure your hair does not get caught in the device.


Arm

1. Sandwich the flesh between thumb and forefinger with the rollers and move the roller pressed against the back of your hand in semicircular motion.
*Do not place fingers individually between the rollers. Doing so may result in injury to the joints of a finger.

2. Pressing against the center of the fleshy portion of your palm between your wrist and your little finger, roll towards your little finger.
*Do not place fingers individually between the rollers. Doing so may result in injury to the joints of a finger.

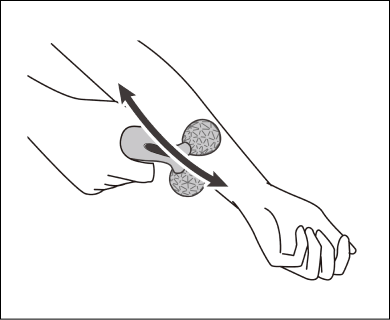
3. Roll from your wrist to your elbow, as if holding the inside of your elbow between the rollers.

4. Roll your upper arms toward your armpit

*This is an area where your skin can easily pinched by the rollers. Always be careful when adjusting the angle and pressure of the rollers against your skin.


Bust

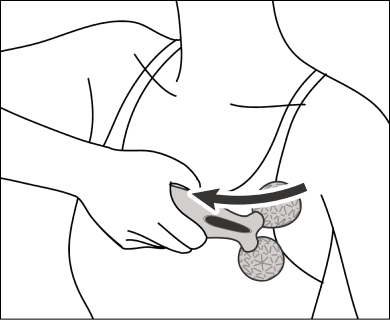
Pressing dow below your armpit, roll towards the center of your chest.
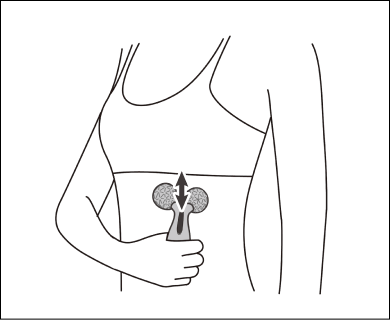
Roll up and down, applying pressure upwards your chest.

Waist

Roll along your body between your lower bust line and your waistline.
*This is an area where your skin can be easily pinched by the rollers. Always be careful when adjusting the angle pressure of the rollers against your skin.
In the abdomen area, draw upwards as you roll diagonally.
*This is an area where your skin can be easily pinched by the rollers. Always be careful when adjusting the angle and pressure of the rollers against your skin.


Legs

1.Roll over the entire sole of your foot. Finish up by pressing one roller against the area indicated by the “O”.
2. Roll over the sides and instep of your foot. This can be especially comforting after a bath.
*Do not apply excessive force when rolling along the joints off a finger. Doing so can result in injury.
3. Roll up and down around your ankle. Apply an amount of pressure that is most comfortable to you.
*Be careful your Achilles tendon does not get pinched in the device.
4. Roll along the calf from your ankle to behind your knee.
*Be careful your Achilles tendon does not get pinched in the device.
5. Roll on the inner side of your thigh.
*This is an area where your skin can be easily pinched by the rollers. Always be careful when adjusting the angle and pressure of the rollers against your skin.
6. Roll the area along the back of your thighs between your buttocks and the back of your knees.
*This is an area where your skin can be easily pinched by the rollers. Always be careful when adjusting the angle and pressure of the rollers against your skin.


Assisted Rolling

<For a smooth and firm neck line>
Roll gently along your neck and shoulder in smooth, continuous motions.
<For an elegant back>
Roll on the back which is hard to reach yourself. Roll up and down along your shoulder blades.
*Do not use along the spine or in other locations where bones protrude.
<For supple, beautiful legs>
Roll from your ankle up to your buttocks. Give attention to your entire legs.


Assisted Rolling

The hand not holding the device must stay in constant contact with the person’s skin.
*Microcurrent will not be circulated if there is no physical contact.

Featured product

ReFa CARAT

MTG Pacific

ReFa CARAT

$268 $330

A platinum 360° multi-angular roller fits over every detail of your face and body. With ReFa CARAT you can achieve more youthful, firm looking, beautiful skin. Equipped with Double Drainage* rollers that replicate professional deep kneading manipulations.

* Drainage is a term that describes a technique performed by professional estheticians, and is not meant to express any effect the product has on your body.